One thing that we instantly liked after moving to Germany is that a washing machine can be placed in the basement. Every building we lived in had a laundry room for tenants to put their appliances in. It was natural to have one in our own house, so we had to change the construction plans a bit to accommodate it.
While having Wi-Fi in a washing machine or a drier is a point of controversy, one can find a valid use case. There is no easy way to know when they are finished when they are located two flights downstairs. One can either walk or get a notification on their phone. This is precisely when a Wi-Fi connection becomes handy. At least, this is how we were always using it. As you might have already guessed, I’d like to talk about our home appliances today.
Home appliances Link to heading
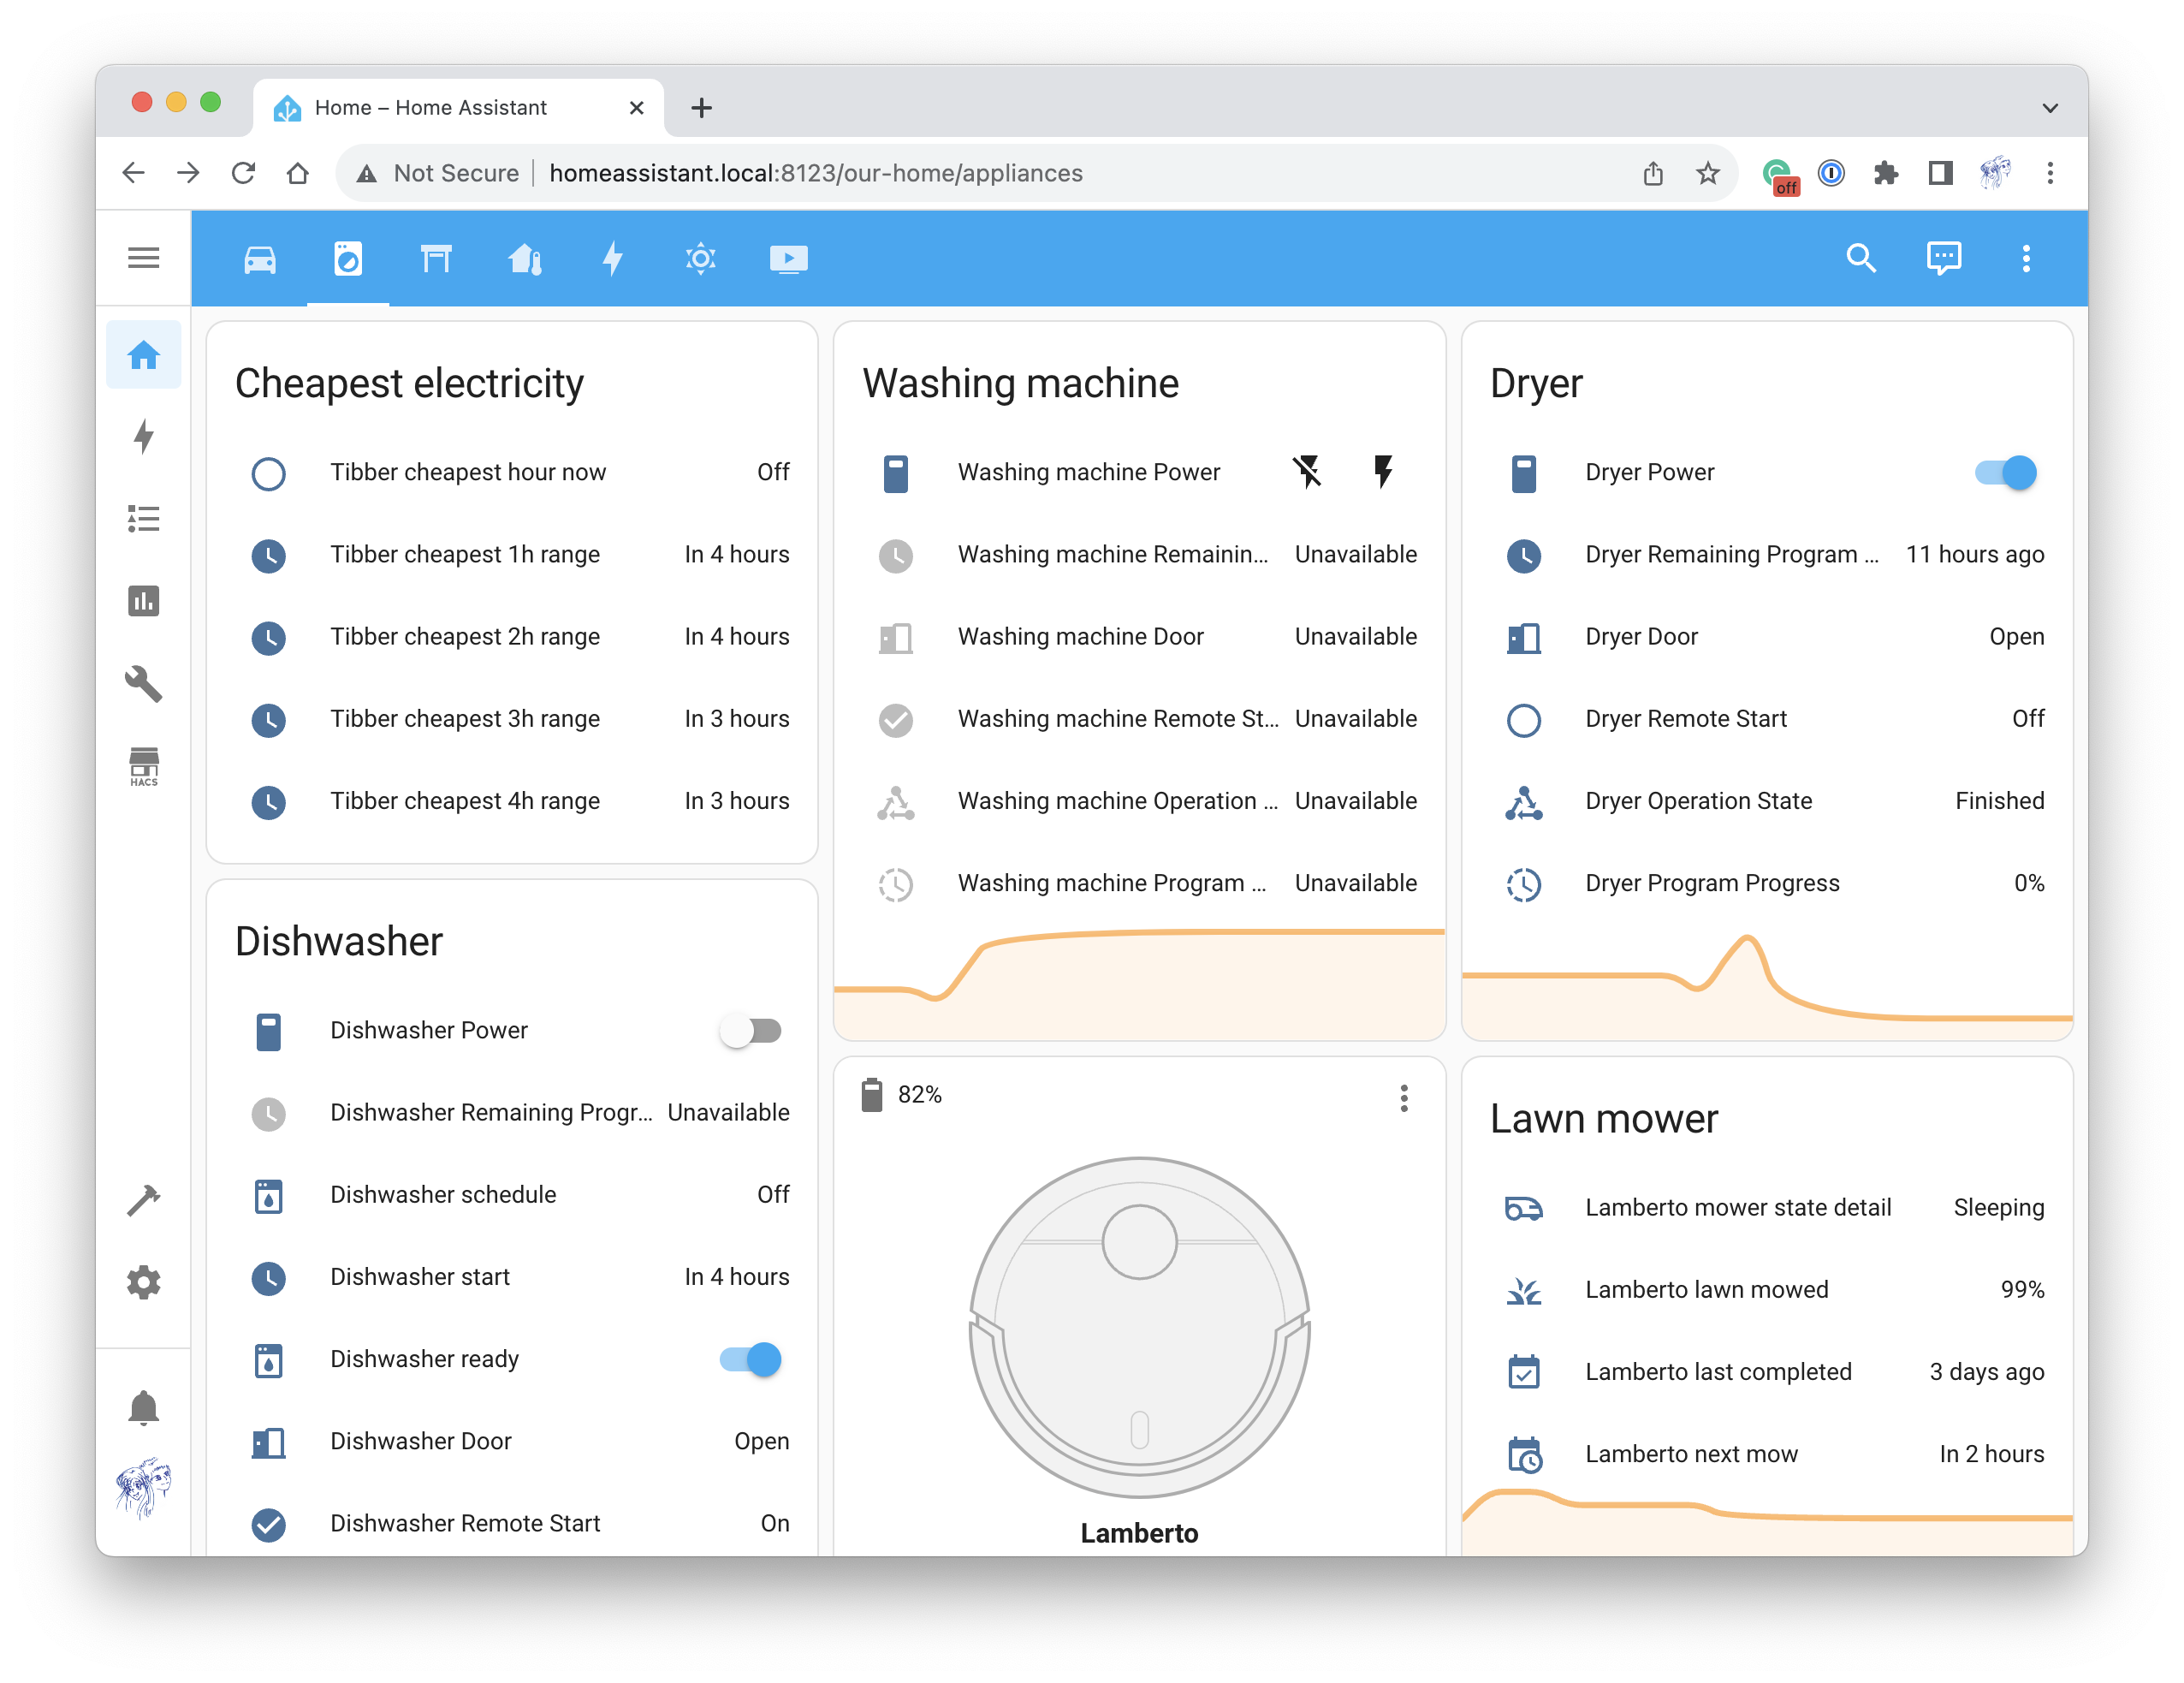
We have a washing machine, a dryer, a dishwasher, and a lawn mower. The latter doesn’t really belong to home appliances. Still, I was reluctant to create a separate page just for it as we don’t have other connected things in our garden (yet). Also, all these devices are from Bosch, so it felt natural to group them together. Anyway, I don’t have much to say about the lawn mower, so let it just be in the picture.
All three home appliance devices are Wi-Fi-ready and can be controlled via the Home Connect app. It integrates nicely with Home Assistant. Nevertheless, this is one of the rare cases when I actually prefer the native app. The reason is simple: there are way too many programs that one could use to wash and dry their clothes. At the same time, the native app provides step-by-step instruction that helps to set all the parameters right depending on many factors such as fabric type and how dirty things are. Notifications also work rather well.
I was thinking about automating the washing machine and the drier. I didn’t come up with much. As there’s no way for the automation to guess the washing/drying program, it couldn’t just start it at the right time. The best idea I got is to add a sticky notification about the finished device that disappears only when it gets unloaded. As it doesn’t seem to be a big problem to solve, I didn’t implement it yet. Perhaps one day, I’ll have a tablet somewhere in the house to show relevant information. But I’m not there yet, too.
There’s one more thing that severely limits possibilities for automation. To allow a remote start, one has to manually turn on a washing machine or a drier and then push the Remote Start button. If the device doesn’t start within some time frame after that, it turns off and can’t be turned on again programmatically. Our dishwasher doesn’t have this problem as it has a setting that allows to constantly enable a remote start. It makes me hope that Bosch solved this problem in all newer appliances.
Tibber Link to heading
You might have noticed a card on the screenshot above showing when the cheapest electricity starts. We have an electricity provider that allows us to pay on an hourly basis. We get the same exchange price as other electricity providers in Germany with taxes on top and about five extra euros for Tibber (Achtung! Referral link.) So far this year, the average we paid per kWh is below the fixed contract offers we got in January. But as the price is dynamic, the situation could easily change (let’s hope not.)
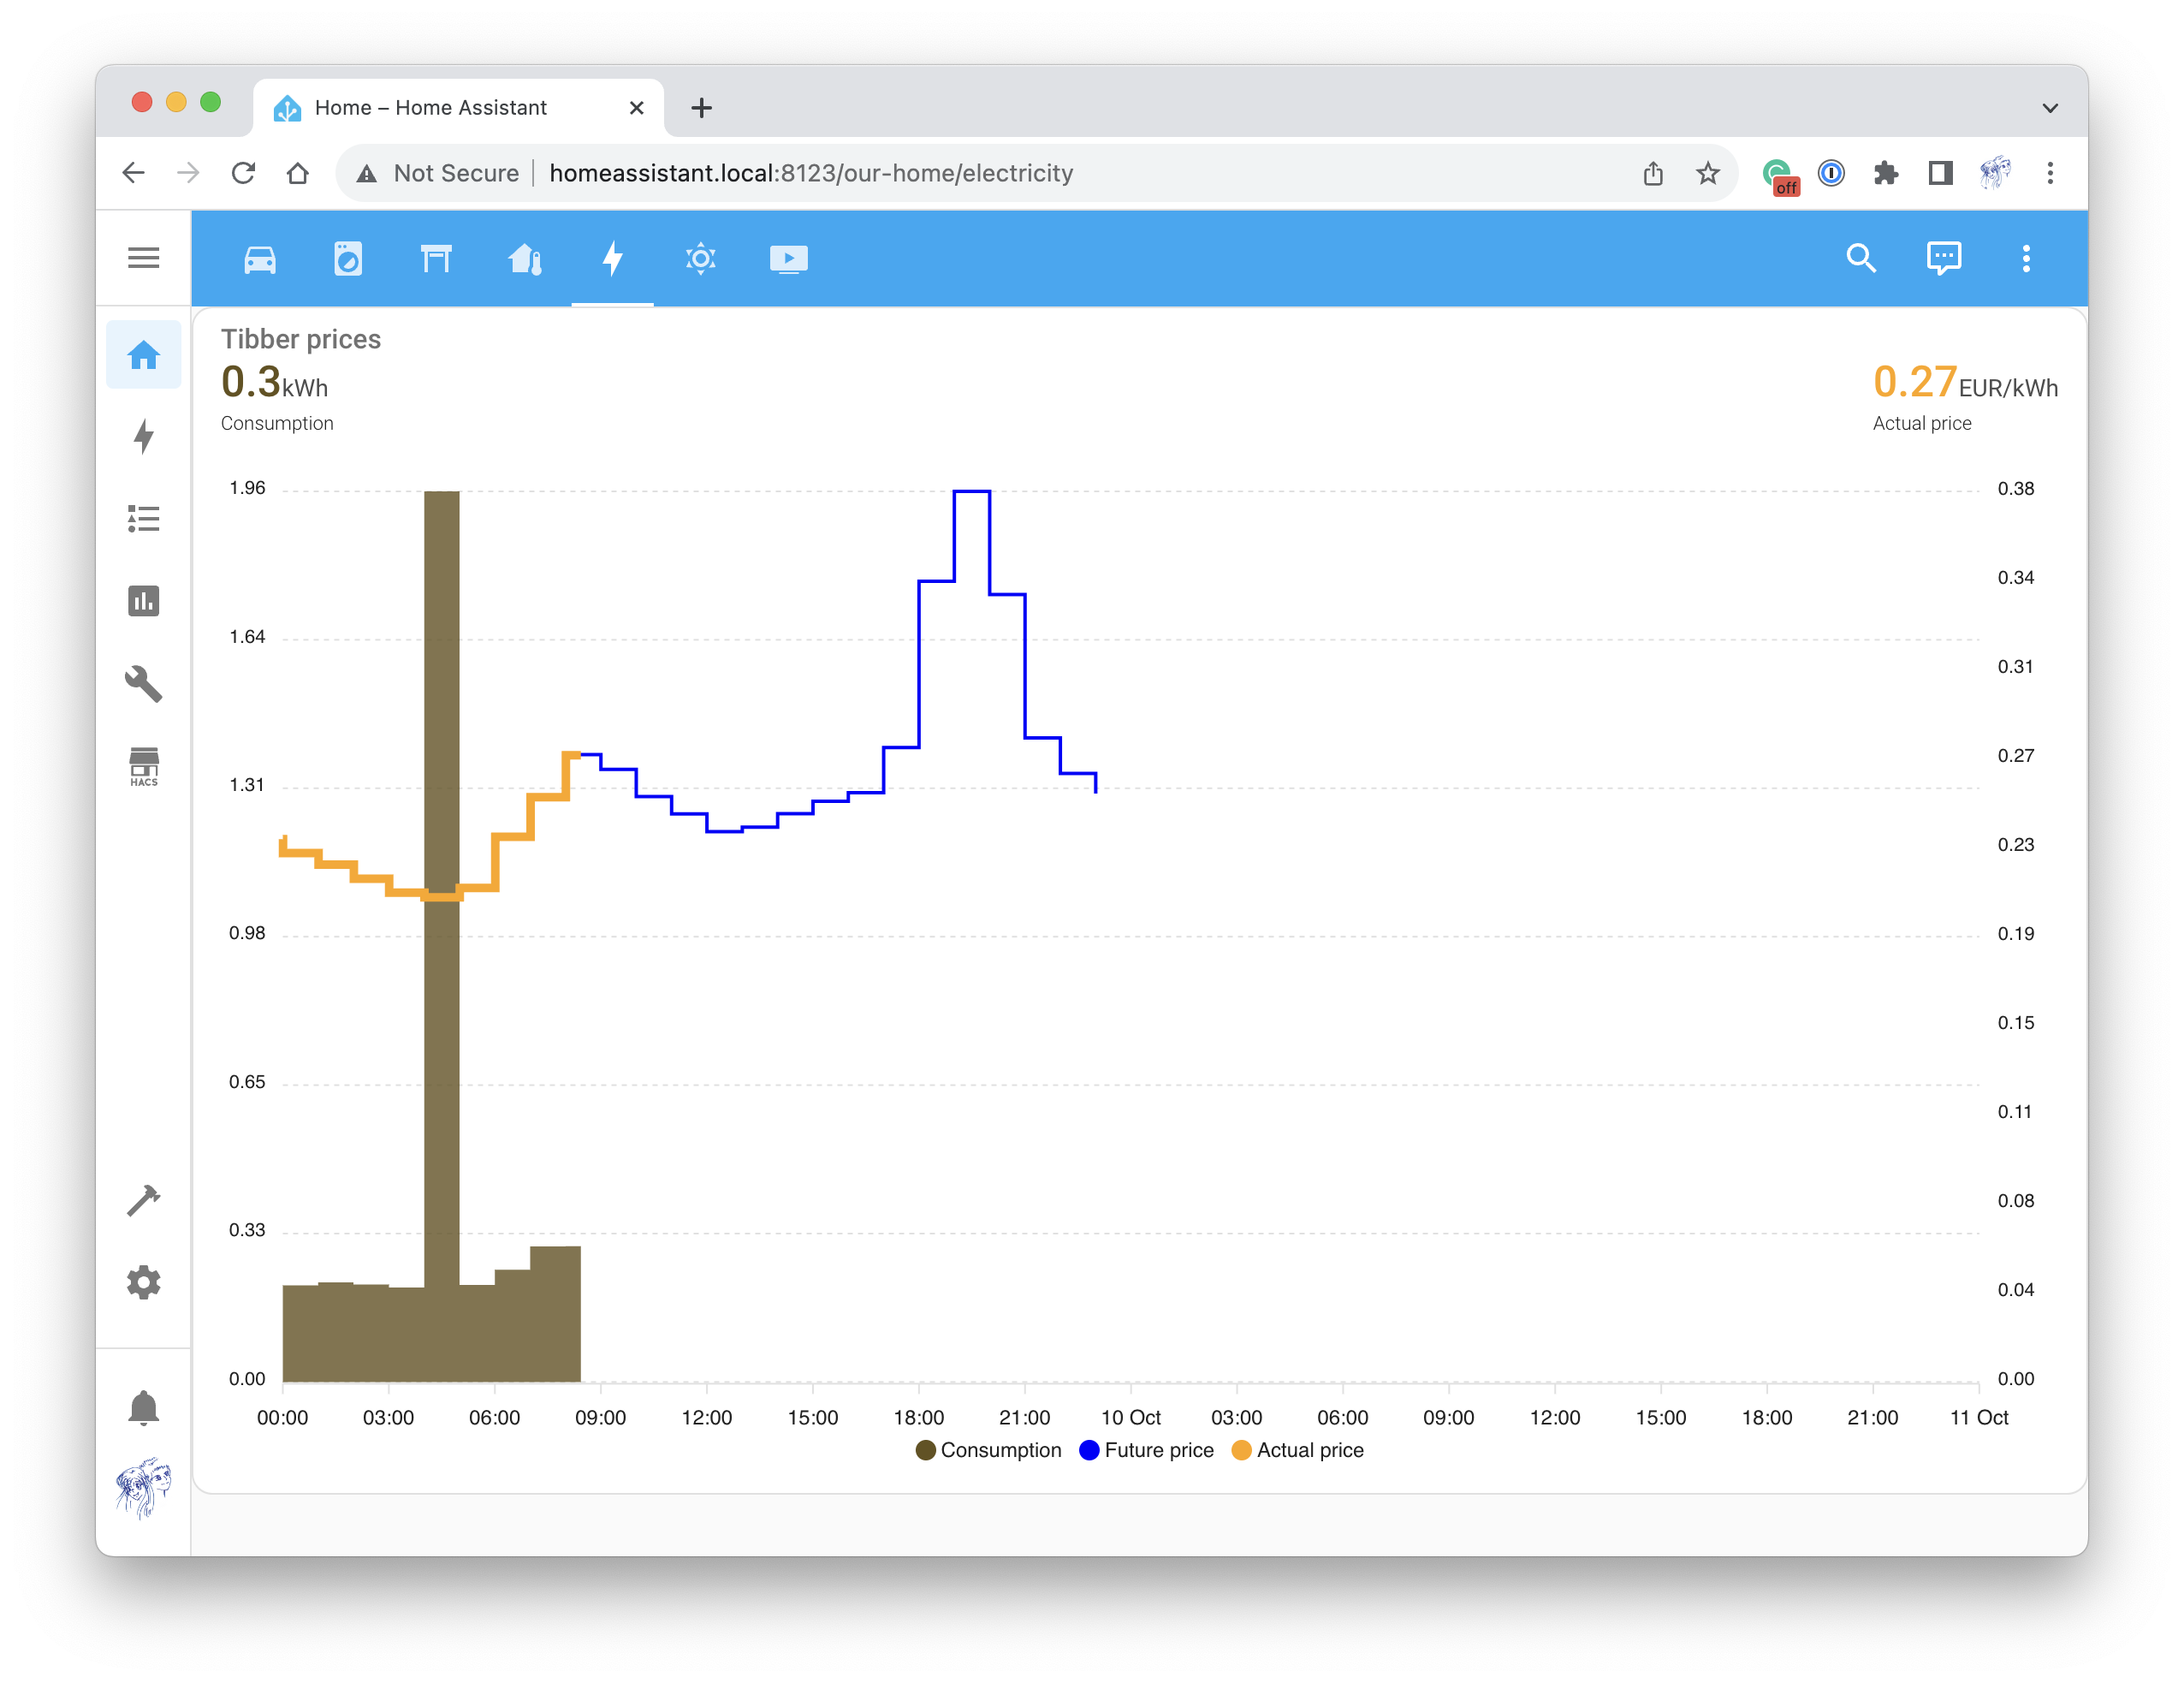
When I properly configure the Home Assistant’s Energy dashboard, I should probably write a post about Tibber. But for now, it’s enough to know that every hour has its own electricity price, sometimes higher and sometimes lower. As my wife noticed, it’s similar to having solar panels.
Our current workflow with washing and drying is as follows. Whenever we want to do it, we first load the device and pick a program. Then, if we need the result ASAP, we just start the machine. If the result could wait, we choose a time slot from the dashboard card depending on the program length and configure a postponed start. This way, we unload an electricity grid during peak hours a bit and save some money. This approach doesn’t seem to change our usual routine much.
Dishwasher automation Link to heading
It’s a bit different story with a dishwasher. Even though there’s a variety of washing programs, we mainly use one: Auto, with default parameters. This makes it a good candidate for automation.
In the beginning, I set a few rules for the automation that I tried to follow.
- It shouldn’t interfere with normal device operations. If, for example, we have a guest unaware of the automation, they should be able to use the device as they would typically do.
- It should involve as little special knowledge as possible. The simpler the automation, the higher the chances it’ll be used.
- It shouldn’t involve additional devices. It’s tempting to place an NFC tag or a hardware button nearby, but I was trying to avoid it for the reason above.
In the end, I achieved all three. It made the automation rather complex but easy to use. What’s important is that it proved to be reliable. It consists of four parts: three auxiliary services and the automation itself. I’ll describe them one by one.
Schedule Link to heading
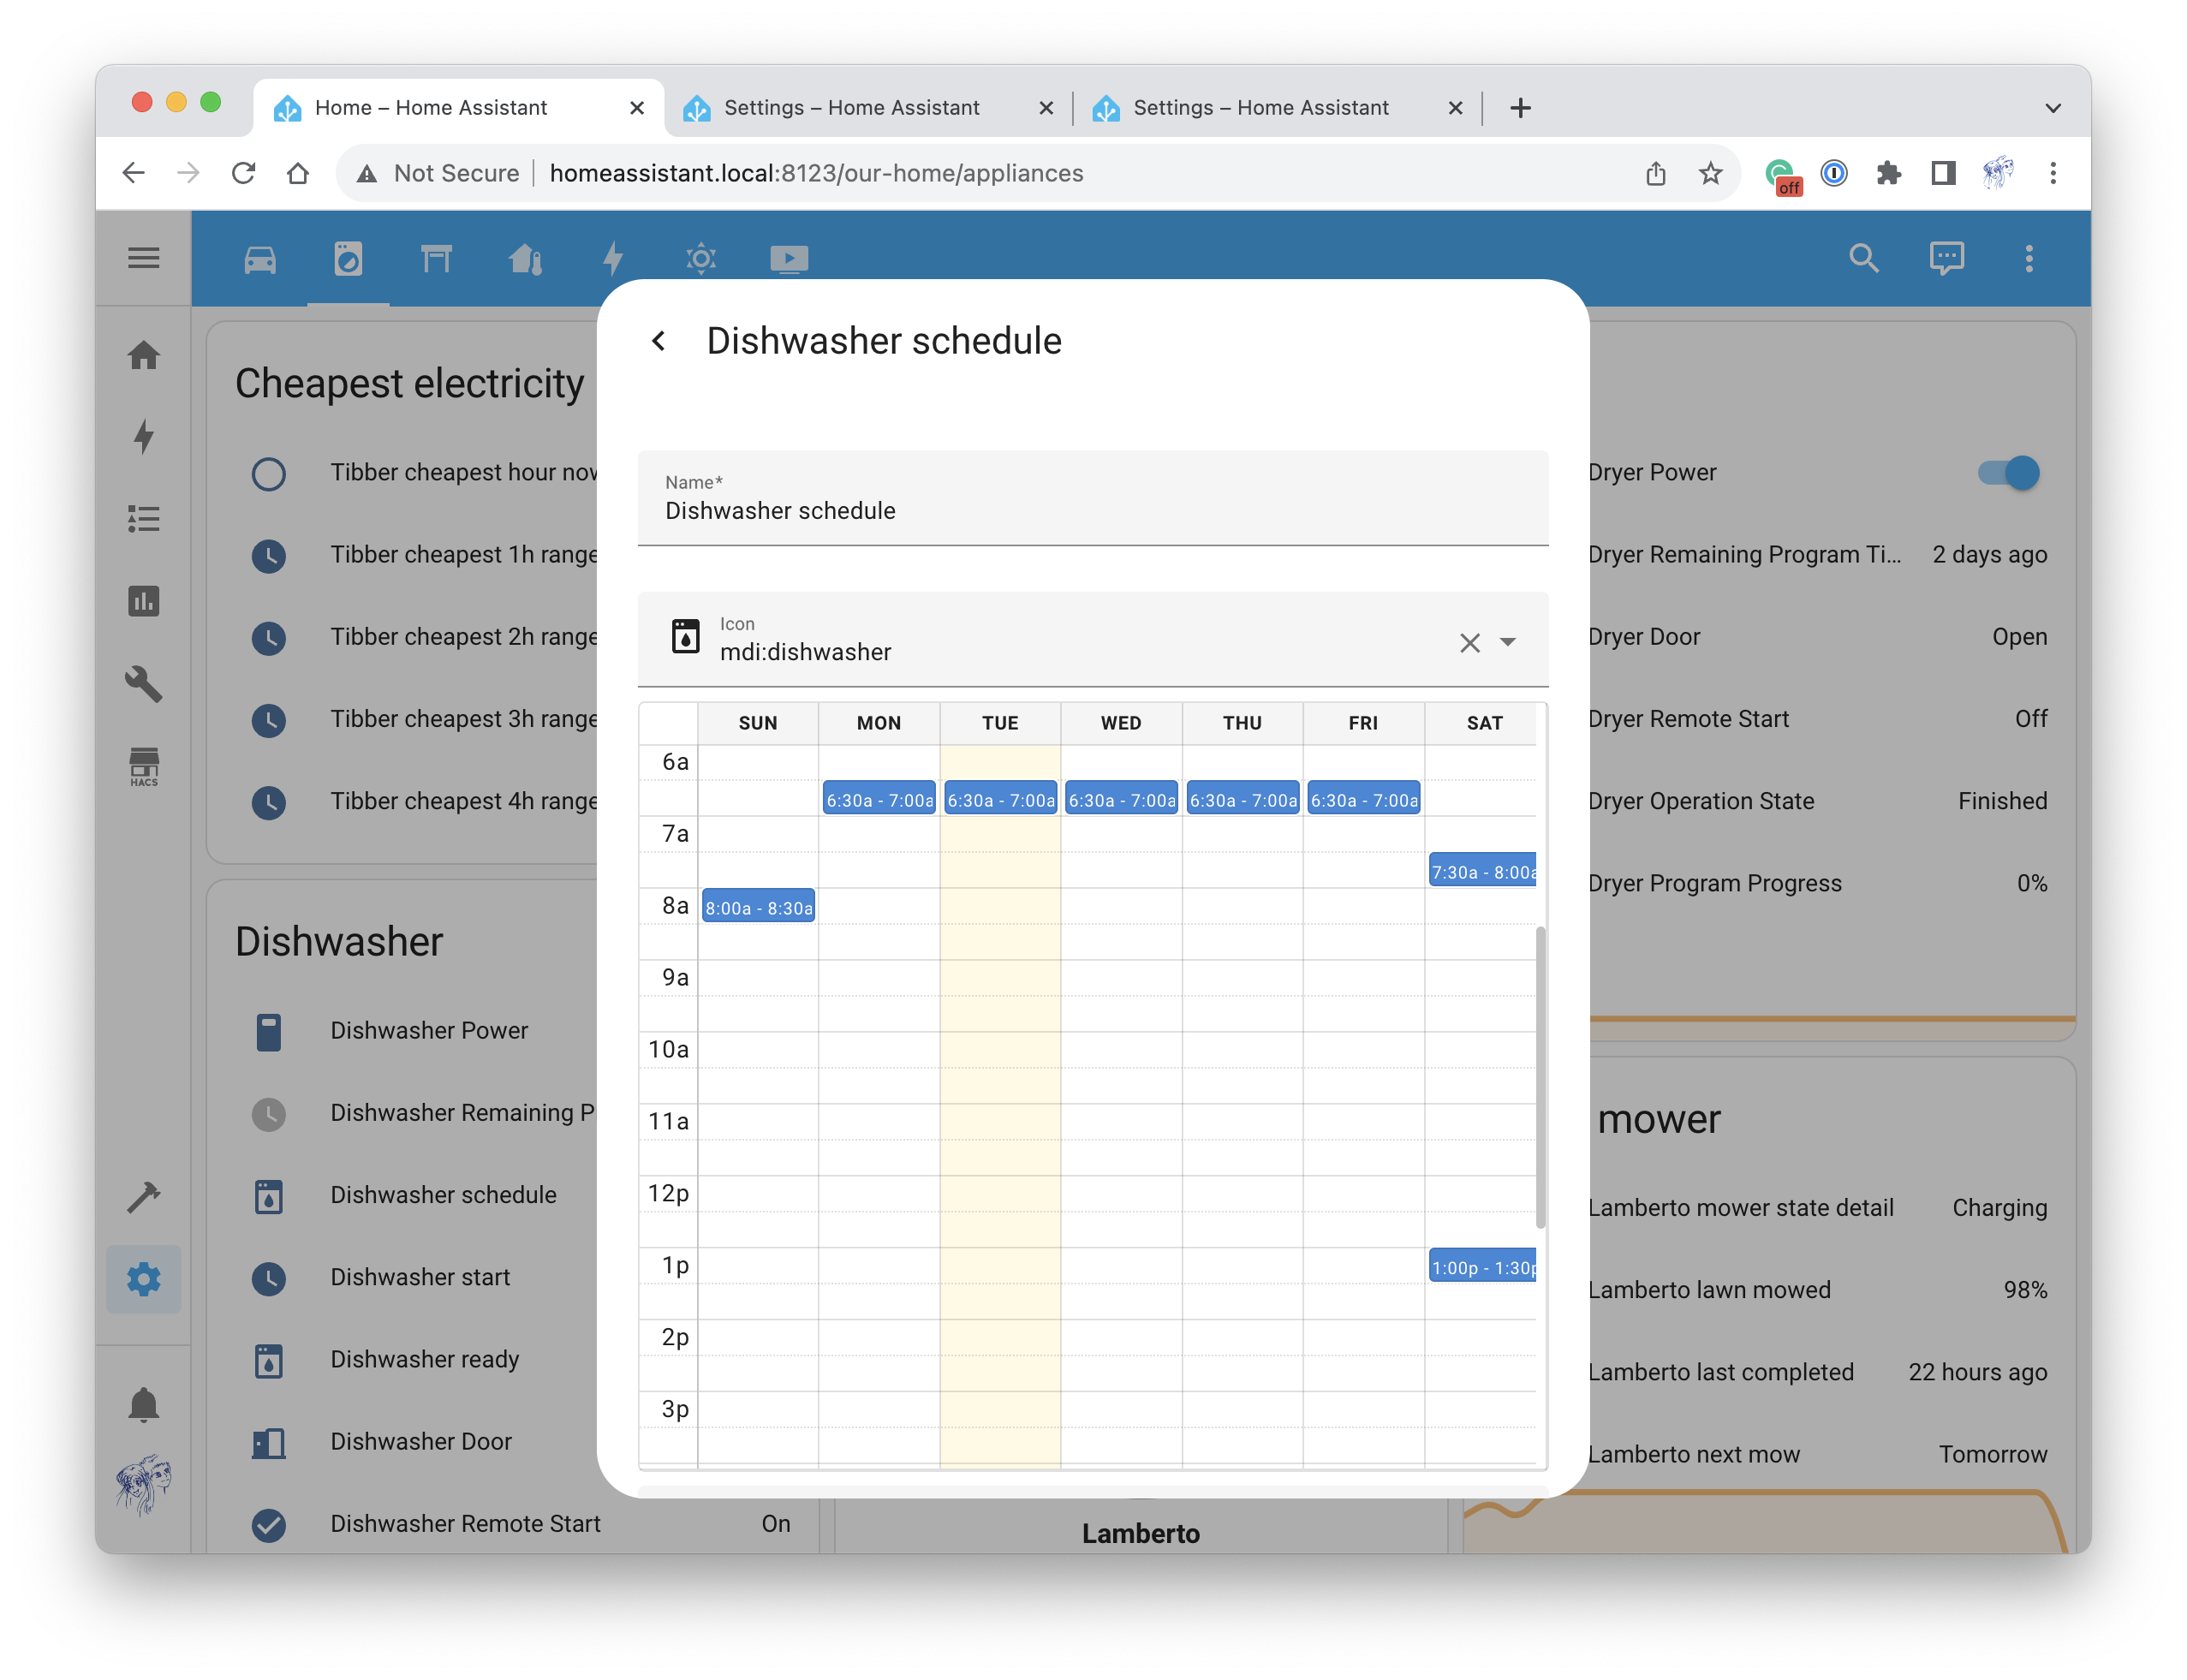
The initial implementation was simple: find two hours with the cheapest electricity and start the dishwasher. It worked for a while until prices started slowly going down in summer, perhaps due to excess solar energy. Tibber, our electricity provider, adds new prices daily at 1am. So, if tomorrow has an even cheaper two-hour range, the dishwasher doesn’t start today. The solution was to add a schedule.
Together with my wife, we identified time slots when we expect to have clean dishes. The automation now takes them into account and looks for the two cheapest hours that occur before the next event from the schedule. I used a Home Assistant helper so that we could modify the schedule with ease. (Though I’m not fully satisfied with how it works on Android, but it’s a different story.)
Timestamp sensor Link to heading
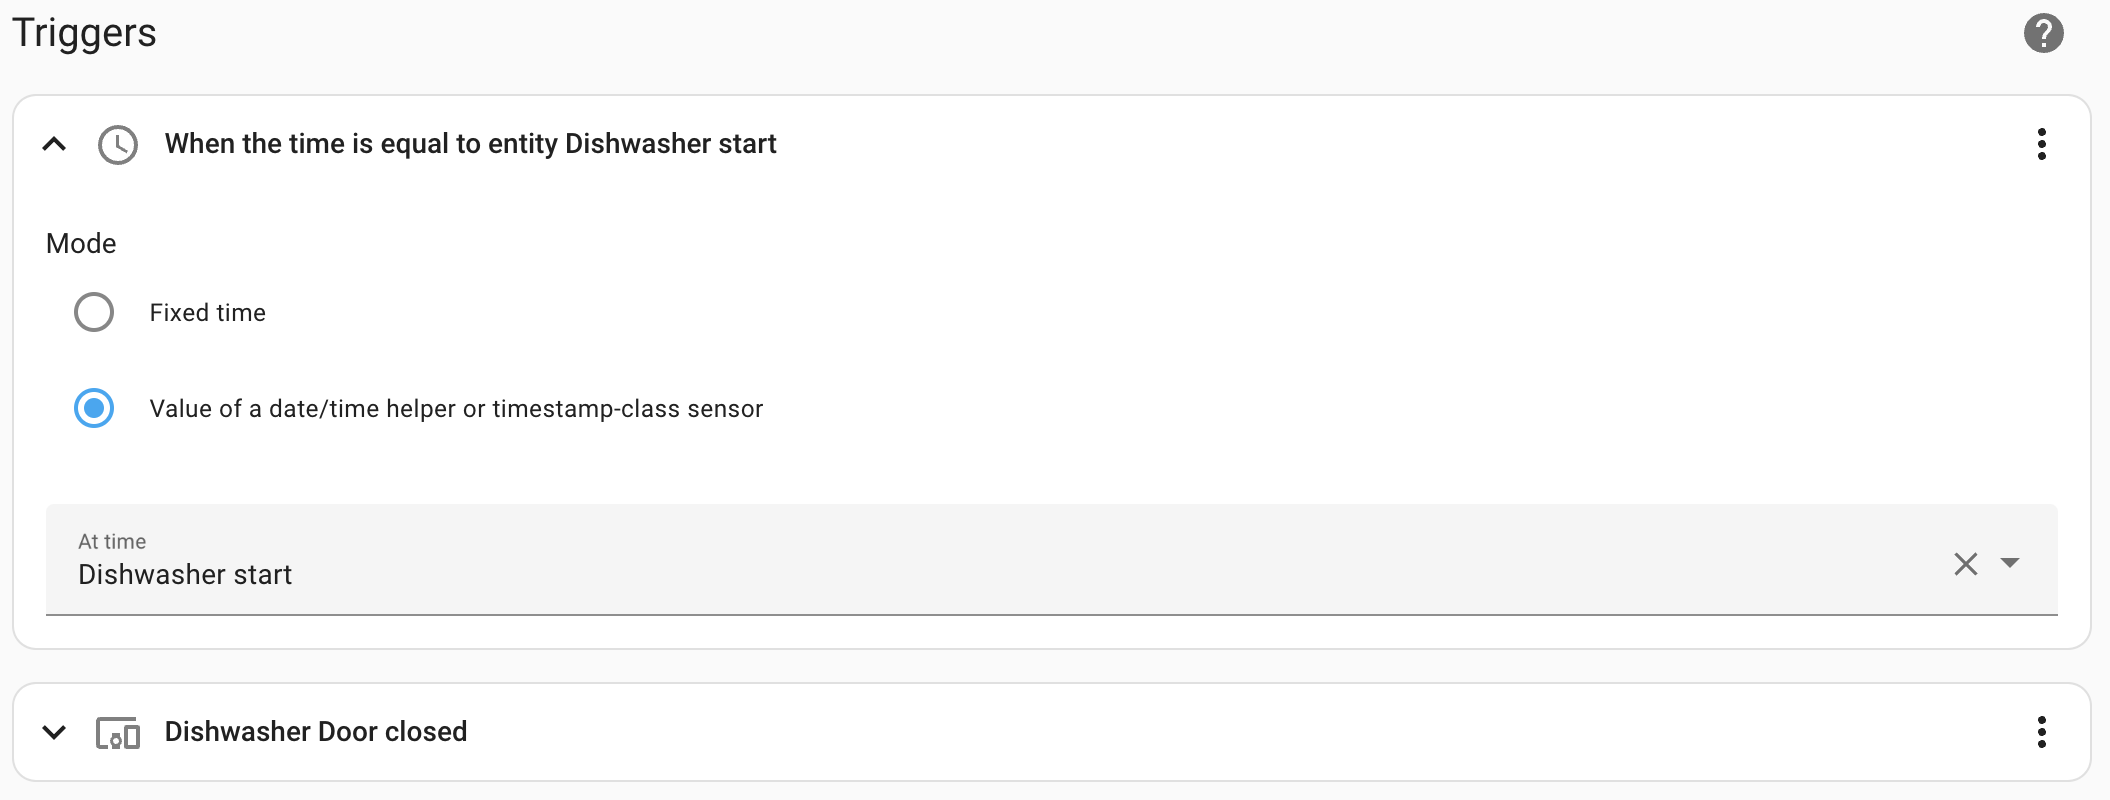
The easiest way to start a time-bound automation is to use a time trigger. It can be pointed to a sensor with a timestamp class. This way, the time to start can be updated dynamically. The sensor takes a list of electricity prices from Tibber’s REST API and removes past events from it, as well as those that occur after the next event from the schedule. After that, it finds a pair in the list with the smallest sum of hourly prices. The start of the first event in the pair is the sensor’s output. If there’s no such pair, the sensor outputs the current time.
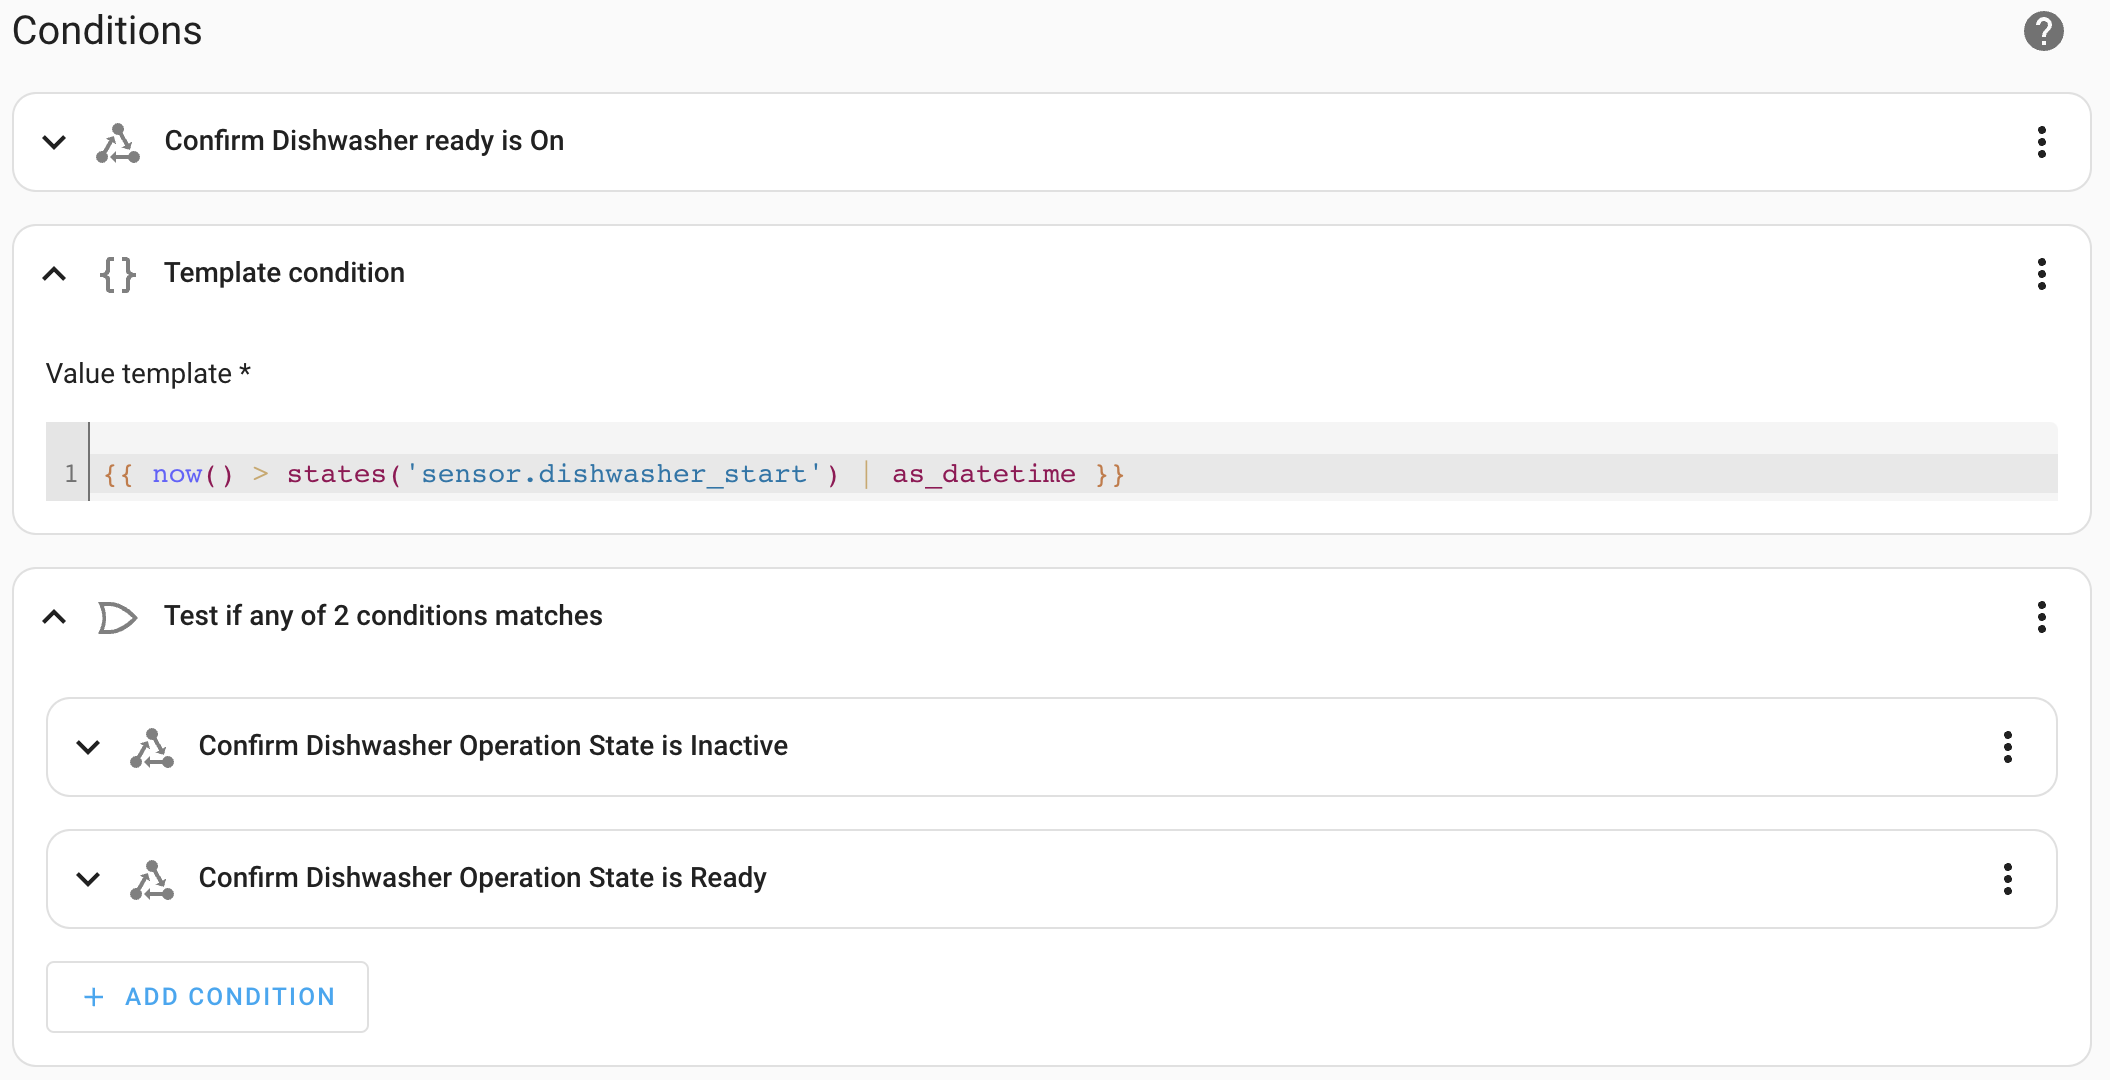
I use a little trick here. The sensor is allowed to return a past timestamp. At first glance, it doesn’t make sense as a time trigger can’t fire in the past, and it’s true. That’s why I have the second trigger that reacts to the dishwasher door being closed. This way, the dishwasher can start immediately if the cheapest hour is now, and doesn’t need to wait for the next hour to begin. The only thing to do is to check the start time in the Conditions section.
Software switch Link to heading
The whole time I was working on the automation, my biggest concern was that the dishwasher would start working when it was not supposed to. I trust Bosch enough so that they won’t let me start the devices with the open door. But I was afraid that I could misinterpret a finished state as a ready one and start washing already clean dishes. It’s not terrible but rather a waste of resources. Additionally, I didn’t want to start a program no one asked for.
After some time, I realized that I couldn’t reliably tell whether the machine was ready to be started by the state it provides alone. This is because it loses its Finished state when it automatically turns off for energy saving. After that, it becomes Inactive or Ready. I decided to add a flag that one could raise when the dishwasher is loaded and ready to be started. But how do we avoid using additional devices for this (rule #3)? I came up with the following scheme.
- When the machine starts working (changes its state to Run), the flag is automatically lowered. The machine now contains soon-to-be-clean dishes, so they shouldn’t be washed again.
- After the dishwasher finishes, it turns off automatically.
- When it’s turned on manually, the flag is automatically raised back. The assumption is that one would only switch on the machine if they want it to work, so it’s loaded with dirty dishes.
All flag manipulations are done in a dedicated automation. Now, in the Conditions section, I only need to check the flag, the time, and the state.
Automation Link to heading
The rest is relatively trivial. As I permanently enabled the Remote Start, I can turn on the device from the automation. It only needs to wait for the machine state to change to Ready, as it takes some time to boot. Then, it checks the door and starts the program. (Did I say I trust Bosch?)

From a user perspective, there’s now a contract that says: If you want the dishwasher to start automatically, turn it on and close the door. The former will raise the flag, and the latter will allow the device to start. If one configures a different program, the machine will operate normally. But the most immense joy is when one follows the steps and the dishwasher starts immediately, which means that the cheapest electricity is now. Well, and that the automation works 😄
Conclusion Link to heading
Whenever I think, “It’s just a single automation. It’ll be a short post for sure,” I end up with a lot of text. I was thinking about it and concluded that I just like how my smart home works and also like telling others about it. I hope you enjoyed reading this post as much as I enjoyed writing it. As always, leave your comments below with tips, suggestions, or anything else.
P.S. I feel that blogs about automations and triggers lack Yaml snippets. I’m now thinking about how to add them without making the page even bigger. Stay tuned.
Would it be nice if a dishwasher could start automatically to save electricity? Yes, it would! Read how I made it happen in my next post featuring @home_assistant, @BoschGlobal, and @Tibber_DE. https://t.co/vSNrRwghak
— Artem Khvastunov (@art_spb) October 11, 2023